
Proof of Delivery
Delivery of proof can be updated in 3 different ways:
By adding :
Notes
Images
Signature
barcode
Image caption
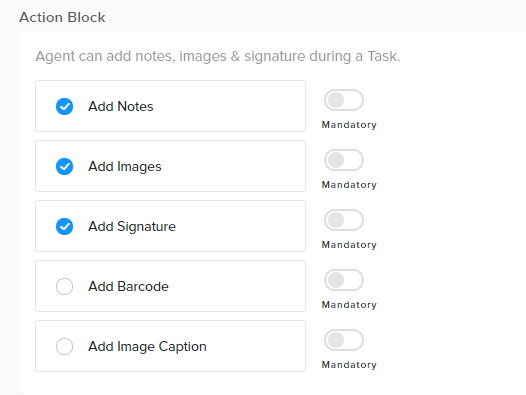
These fields appear on screen only if the user has selected them from the back end (dashboard), after you click on the “Arrived” button. It is entirely the users choice to keep one field as a proof of delivery or more. User can also make these fields mandatory (anyone or all) depending upon the business requirement.
Add Notes
Click on add notes and you switch to another screen, write the note and it automatically gets saved. You can add multiple notes and even you can edit or delete them till the time you have not clicked the successful button.
Add Images
Click on add images and you switch to another screen, where you can upload an image from the gallery or take a new picture. You can add multiple images, to delete an image press the particular image a confirmation pop up appears click yes to proceed or no to cancel.
Add Signature
Click on add signature and you can take the signature of the customer. You can reset it, if not correct or update. You can even delete it till the time you have not clicked the successful button.
Add Barcode
Click on add barcode and you switch to another screen, where you can upload an image from the gallery or take a new picture.
Add Image Caption
Click on add image caption, where you can give a caption to the image added.
When you get the required information click on “Successful” button. Your task will not be considered complete until you get all the mandatory data and if you are unable to do so click on “Failed” button.
Once you click on Successful/Failed button you are unable to add notes, images, signatures, barcodes and image captions, you can just view them.
Leave A Comment?