
CUSTOM PG DOCUMENTATION
————————————————————————————————————————————
A Payment Gateway is defined as a piece of software used by online service providers, to authorize and conduct digital payments. Almost all online purchases require a Payment Gateway from e-commerce shops, to marketplaces, or to web-based service platforms.
There are several maintenances and developmental costs involved in building your own payment gateway from scratch. You’d be paying much less to use an external payment gateway system than you would if you were to create a payment gateway system yourself.
So you can create a custom platform on top of existing Payment Gateways, rather than building it from scratch.
For this, you need to first create the custom platform API on your end which will get integrated with Yelo in the below steps.
API DEVELOPMENT STEPS:
————————————————————————————————————
Follow the steps below to develop a custom PG for Yelo-
- The client/You needs to create an API that receives the below request of getPaymentURL and responds with a redirect URL. This API URL needs to be configured in the yelo dashboard under the custom PG section.
Sample request body:
{
“amount”: 32.30,
“currency”: “USD”,
“email”: “df@gmail.com”,
“phone”: “+919876543211”,
“reference_id”: 33762387, // to be sent in webhook in step 3
“first_name”: “ABC”,
“last_name”: “DEF”,
“cancel_url”: “https://SystemGeneratedurl.com/Failure”, //redirect to this when failed or cancelled and this URL will be generated by Yelo’s system.
“return_url”: “https://SystemGeneratedurl.com/Success”, //redirect to this on success and this URL will be generated by Yelo’s system.
“custom_pg_id”: 22576 // need to send on webhook
}
If job (order) details are required before the payment as per the requirement of the gateway being integrated or any other use (for ex: job id, commission details or any other data related to the job) then one can get the same.
To enable the same, kindly email us at ” csm@jungleworks.com ” with the Subject: “Detailed Custom Payment Gateway Enable: User ID”; we will allow the same for your account and confirm the same on the email.
Post successful enablement of the same, the API response will have 2 new fields: “job_id” and “additional_data”
The detailed format is attached below for reference:
{
“amount”: 32.30,
“currency”: “USD”,
“email”: “df@gmail.com”,
“phone”: “+919876543211”,
“reference_id”: 33762387, // to be sent in webhook in step 3
“first_name”: “ABC”,
“last_name”: “DEF”,
“cancel_url”: “https://SystemGeneratedurl.com/Failure”, //redirect to this when failed or cancelled and this URL will be generated by Yelo’s system.
“return_url”: “https://SystemGeneratedurl.com/Success”, //redirect to this on success and this URL will be generated by Yelo’s system.
“custom_pg_id”: 22576, // need to send on webhook
“job_id”: 225231 // need to send on webhook (new)
“additional_data”: {} // all job related data reference = api :-
https://documenter.getpostman.com/view/15678241/2s93CUHAQo
}
header:-
‘headers’: {
‘Content-Type’: ‘application/json’,
‘token’ : “mnjkbydersrhjkiiyutretyuygkjg5rserdgukj” //for the server-to-server authentication
}
From header data, you can extract token (auth token) value to validate genuine requests at your end, and from the request body, you can retrieve essential data to create a payment URL.
- The response we need from this getPaymentURL hit is below, to open the URL in popup
Note:- Response must return with status code 200.
{
“message”:”ACTION_COMPLETE”,
“status”:200“,
“data”:{
“url”:”https://dev-payments.vachabi.com/visa-net/xyz” //this is sample url, you will need to send your url
}
}
Custom PG is a Payment Gateway developed at client’s end. That custom payment gateway needs to connect to the payment gateway client wants to use.
The above URL needs to be created by client so that the popup can show that redirect url.
- After a successful transaction, client needs to send webhook on transaction completion on this API end point –
For Live: https://api.yelo.red/open/customPG/paymentStatus
{
“marketplace_user_id”: 19922202, //can be retrieved from getpaymenturl request
“api_key”: “bd2164ada0cd35b9bsb45a51023818532”, // this is the Yelo API key found in Settings -> Keys -> Yelo API Keys
“reference_id”: 33762387, // the one received in request body of getPaymentUrl
“transaction_id”: “bcxzbzbnch787de9ynd”, // transaction id from payment gateway
“transaction_complete” : 1, //If complete : 1 ,If incomplete:0
“custom_pg_id”: “22576” //custom pg id from getPaymentUrl
}
ENTER THE ABOVE CUSTOM PG DETAILS IN YELO STEPS:
————————————————————————————————————
Steps to integrate in Yelo:-
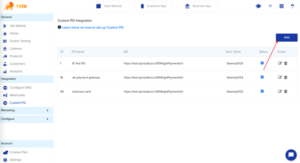
- From the Yelo dashboard in the left sidebar under integration click on Custom PG.
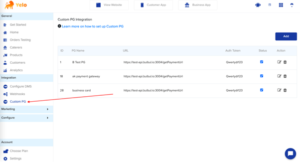
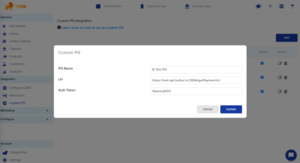
- To add your custom payment gateway click on ADD.
- Enter the custom name, URL of the endpoint API created for the PG, and auth token. These details are mandatory for creating a custom payment gateway integration.
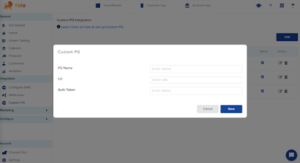
- Click on save. Your custom payment gateway is now ready to use.
- You can see your custom payment gateway in the list view. Here users can see their payment gateway id, payment gateway name, URL, auth token, status of the payment gateway, and edit, delete option for the payment gateway.
- To edit your custom payment gateway click on the edit icon. Edit the details mentioned in the form and click on update.
- For deleting the custom payment gateway click on the delete icon the payment gateway will be deleted.
To implement the refund flow for a custom payment gateway, you need to follow the instructions provided below:
- Go to your Yelo admin dashboard integration settings and navigate to the webhook section.
- Click on the “Add” button to create a new webhook.
- From the dropdown options, select “ORDER_STATUS_CHANGE” as the event for the webhook.
- Enter the webhook URL in the “WEBHOOK URL NAME” field. This URL should be created and handled by you to receive data regarding canceled orders.
- Save the webhook configuration.
When a cancellation or rejection occurs, the payment gateway will send a payload to the webhook URL you provided. The payload will contain various data related to the canceled order. Here’s an example of the payload:
{
“job_id”: 123,
“refunded_amount”: 50.99,
“marketplace_user_id”: 456,
“job_status”: 15,
“transaction_id”: “abc123”,
“merchant_id”: 789,
“customer_id”: 987
}
You need to check the job_status field in the payload.
If the job_status is 15, it means the order was canceled.
If the job_status is 14, it means the order was rejected.
In either of these cases, you should initiate a refund process on your side.
How to set a cancellation policy?
In the order setting, you can define the cancellation policy for customer orders. This policy allows you to specify the amount that will be deducted as a cancellation fee based on the stage of the order (i.e., pending, ongoing, or dispatched). The cancellation policy provides guidelines for customers who wish to cancel their orders. It ensures transparency and sets clear expectations regarding the deduction of cancellation charges. By implementing this policy, you can handle cancellations more efficiently and fairly.
Please note that the specific details and amounts for each cancellation stage will need to be determined based on your business’s policies and requirements. Please make sure to handle the refund flow properly based on the provided information.
Leave A Comment?