
In this article, you will learn about some most common FAQs related to Order Settings.
2. Order FAQs
3. Checkout FAQs
4. Delivery FAQs
5. Cancellation Policy FAQs
6. Taxes, Fees & Charges
Catalog FAQs
- How to enable the menu feature?
Enable the toggle available in configure >> order settings >> catalog.Now when you visit your product catalog, you will have an option to add a menu. - How to make and assign business categories to stores/merchants?
To make business categories on the platform
Go to Configure >> Order setting >> Catalog >> Business categories >> Add Categories and Save.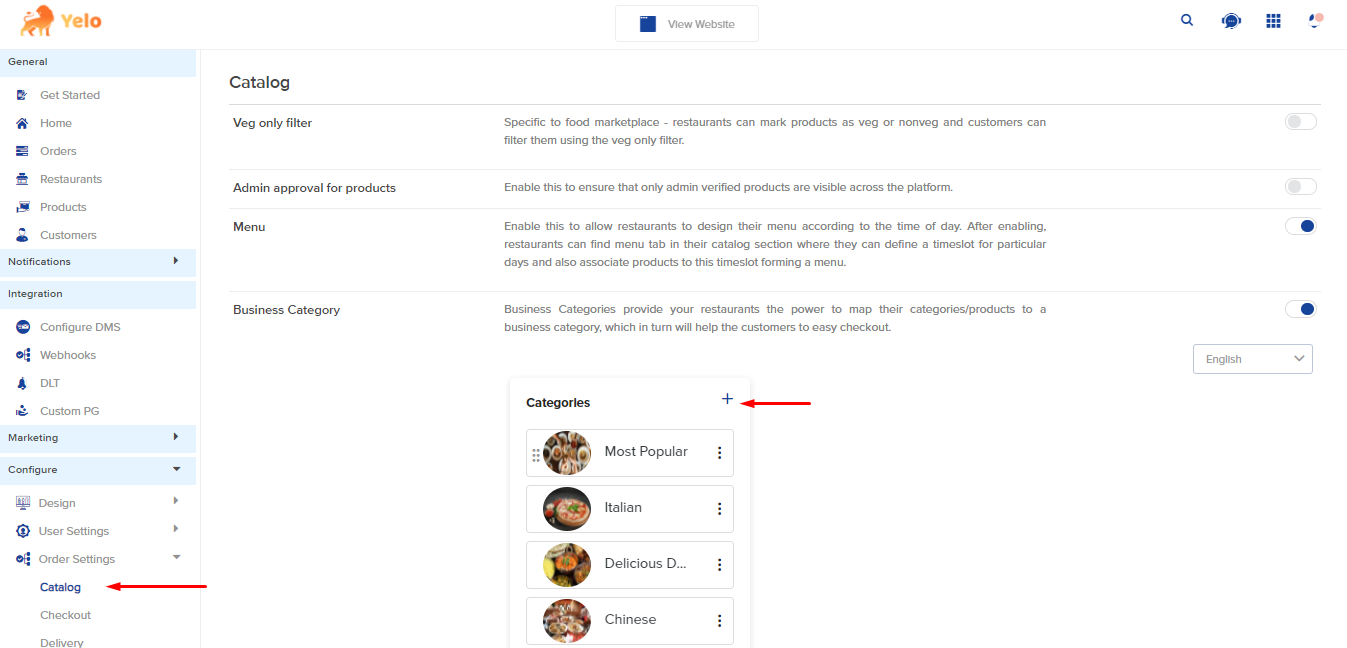
To assign a category to a merchant.
Go to the General >> Merchants >> Click on merchant name and assign a business category.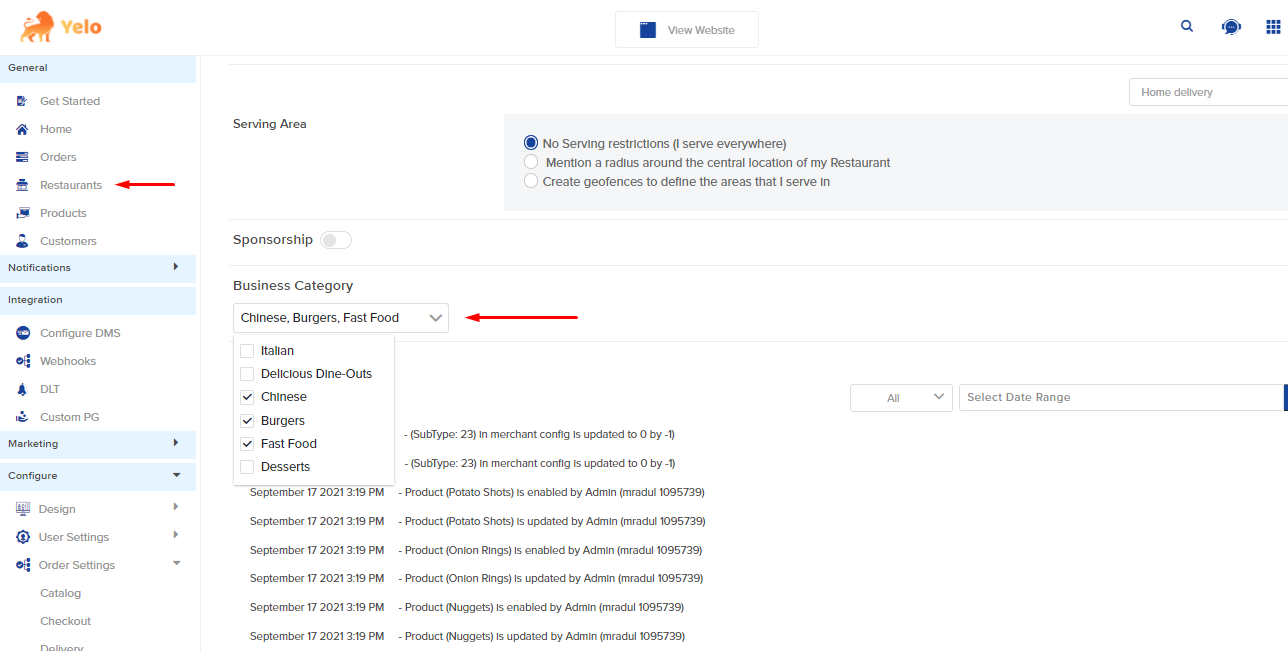
- How do I set a flow where products will be shown only if it’s approved Via Admin?
Configure >> Order Settings >> Catalog Enable the Admin approval for products toggles on.
Enabling this toggle will ensure that only admin verified products are visible on the platform. - Change slider and categories in the marketplace
You may refer to the points/steps/video given below for the issue resolution.
https://help.jungleworks.com/yelo/order-settings/business-category/ - How to enable custom order to a business category.
To assign a custom order with the business category you need to enable Custom Category toggle in Business Category. Go to configure >> Order Setting >> Catalog >> Business Category >> Edit Category >> Enable Custom Category Toggle.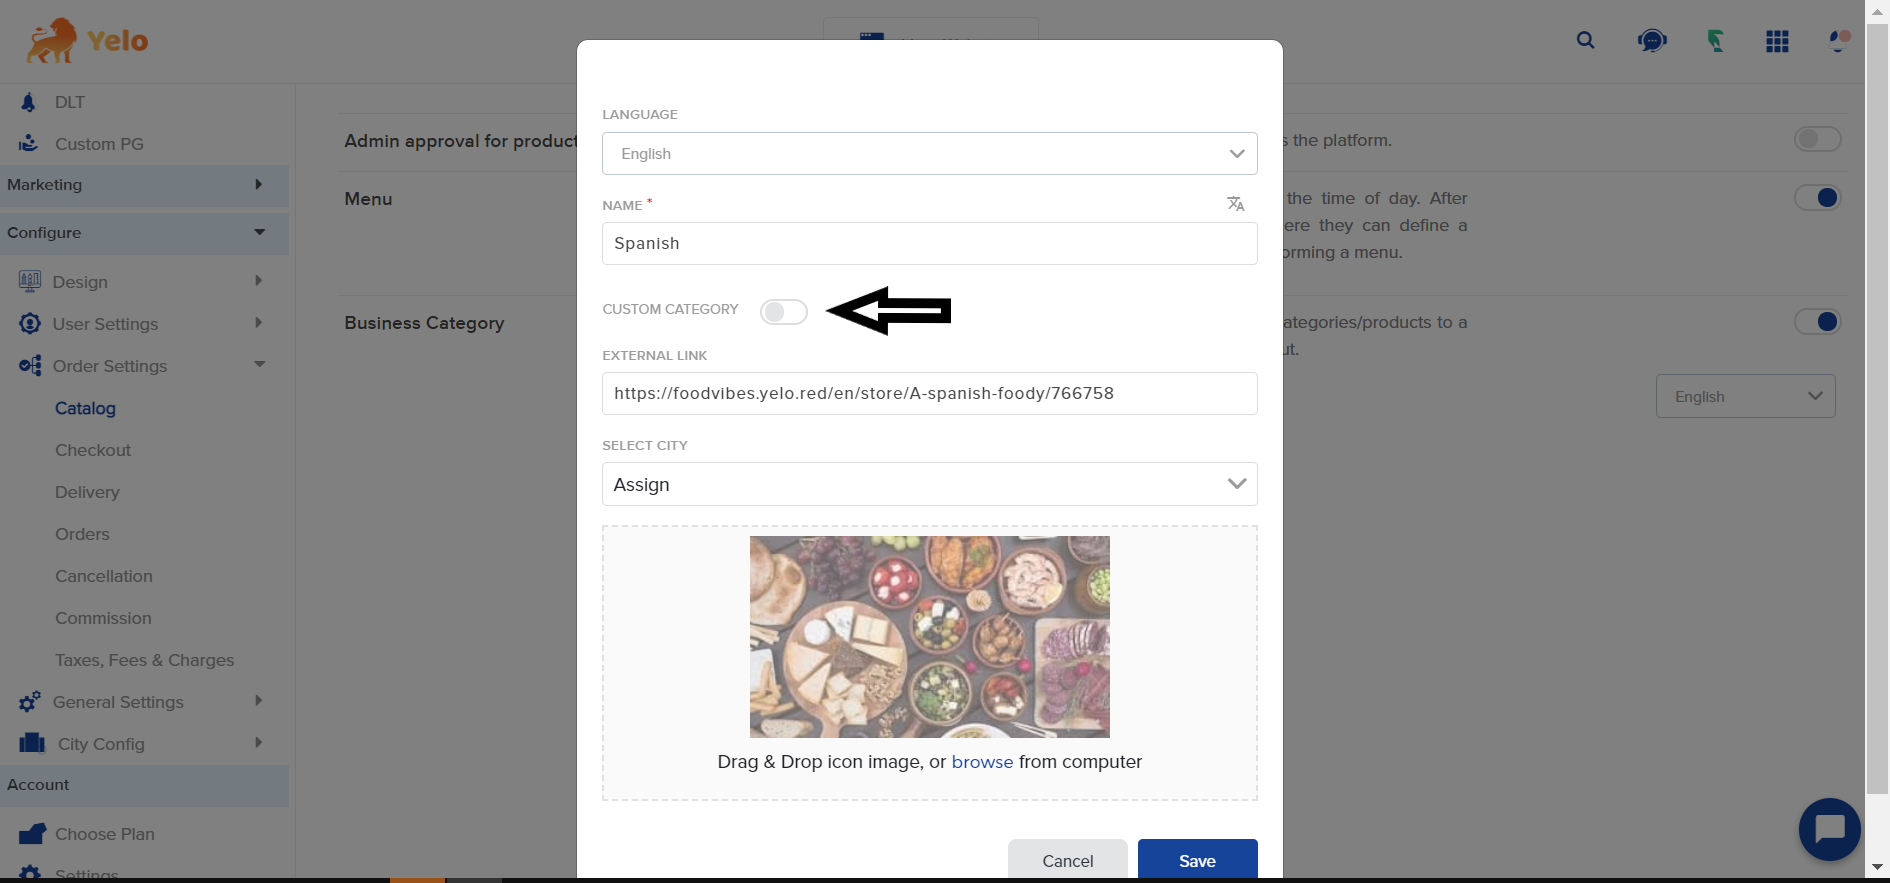
- How can we apply Timewise product availability on a platform?
To enable timewise availability of the products you need to enable the Menu toggle from the Catalogue option. Configure >> Order Settings >> Catalog >> Enable Menu Toggle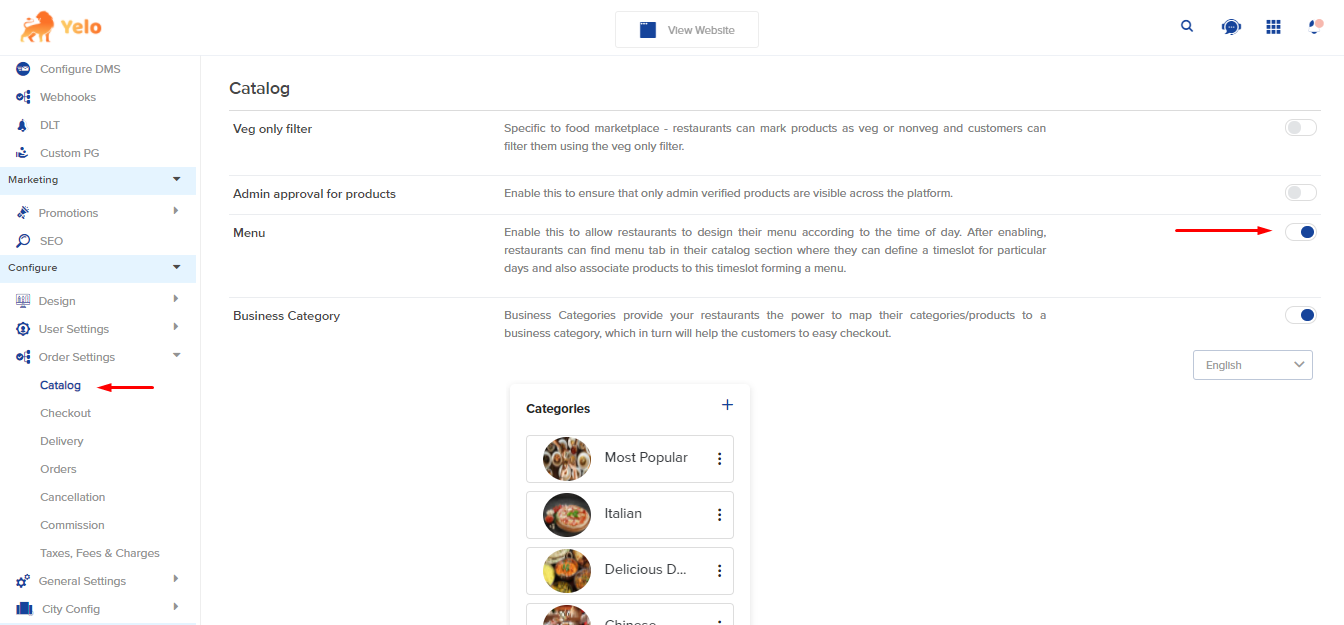 Then go to General >> Merchants/Stores >> Catalogue >> Menu >> Add product timings
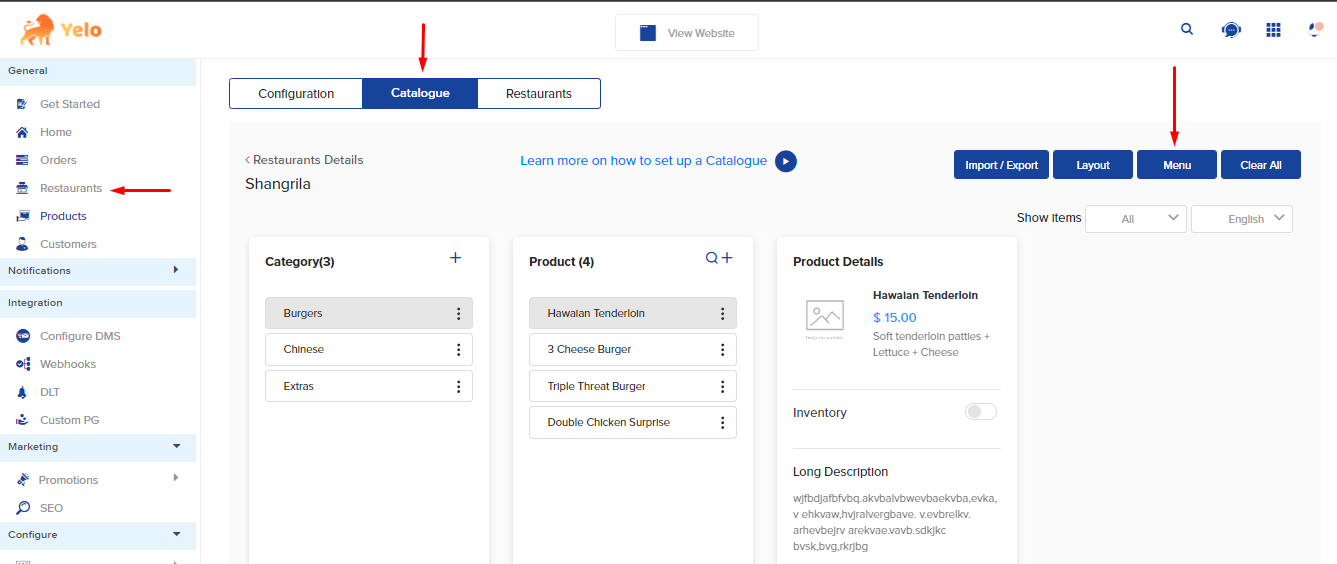
Orders FAQs
- How to add the Ratings & Reviews feature in Yelo?
Go to the configure section click on orders and in the last you can turn on the Ratings & Reviews option. - Is it possible to turn off the COD option for any customer?
Yes, you can turn on OR off COD status for any customer by going under the customer section and then search by customer’s email address or name or by customer ID. and click on the ID. You can turn on OR off the Cod status. - Can we assign specific merchant orders with a specific delivery agent on Tookan?
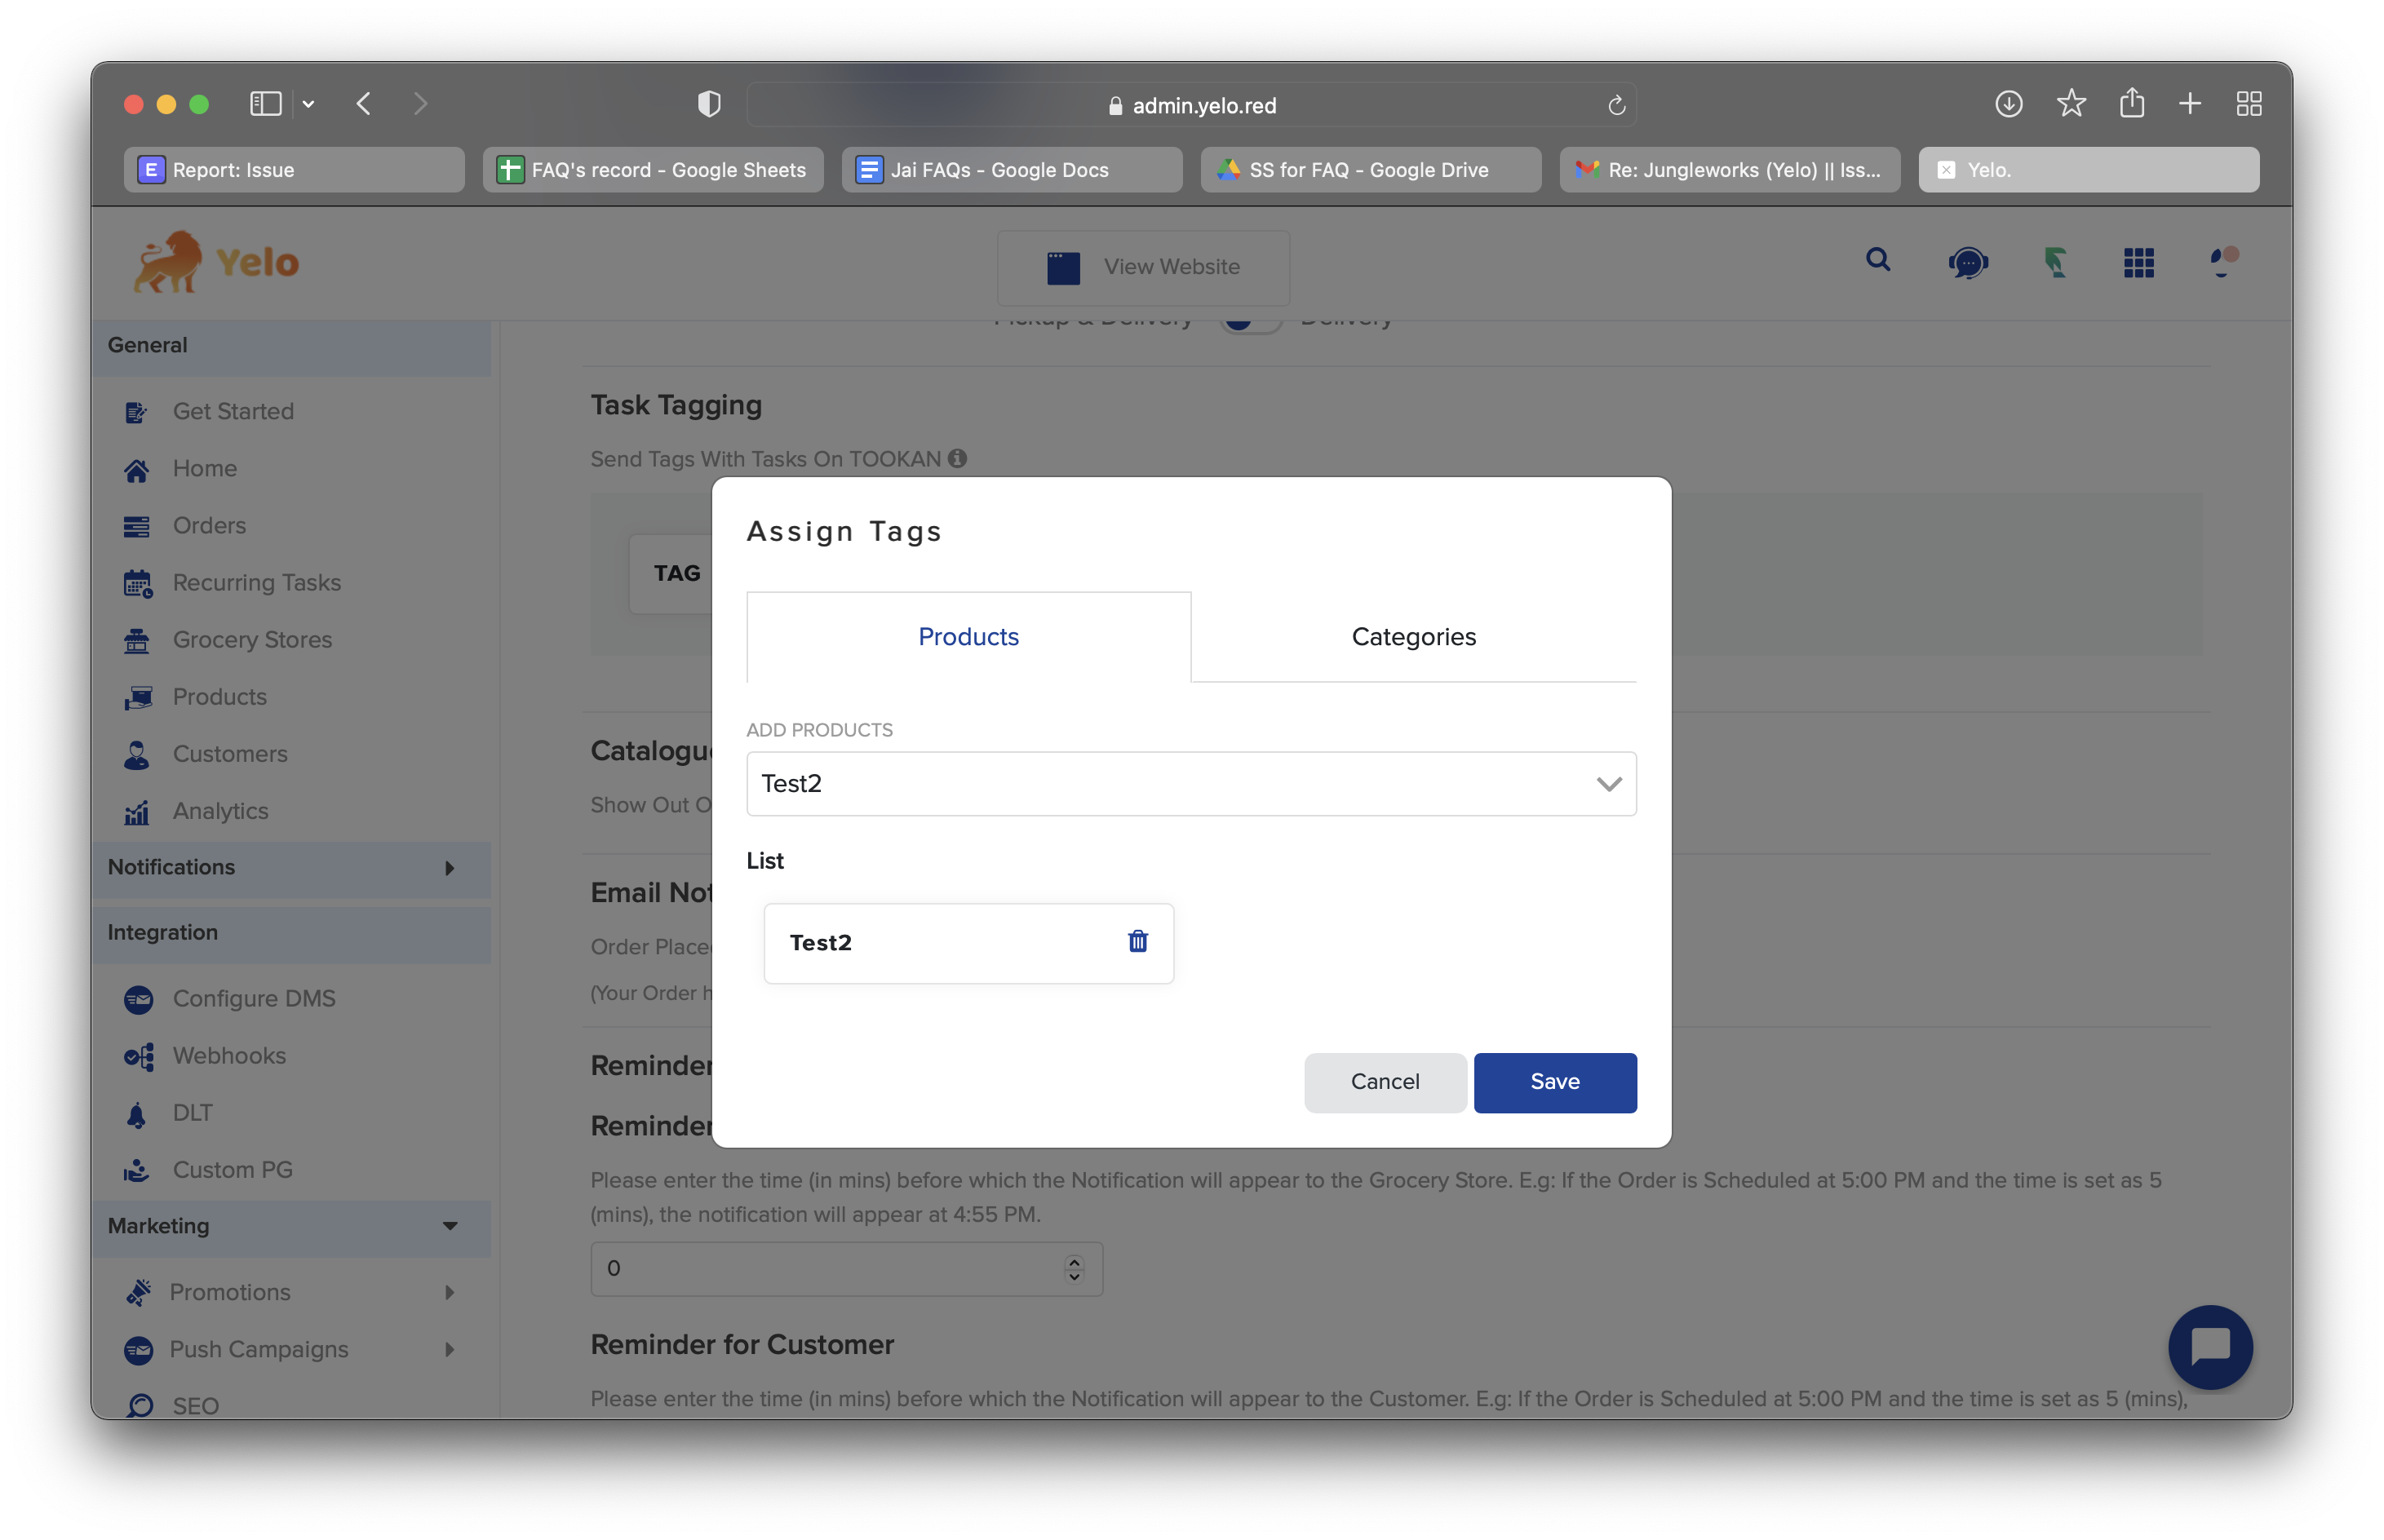
Yes. You can assign some orders of a marketplace to specific agents by creating Task Tags.
You have to create task tags on Yelo and assign them to desired Merchants and then to desired Agents on Tookan.
Dashboard >> Configure >> Order Settings >> Orders
– Enable the Task Tagging toggle and create a Tag.
– In the Merchant configuration, enable Task Tagging and select tags.
– Now apply them to products and categories.
– Then go to Tookan Dashboard and edit agent, select the same tags here and save. - What is task tagging & how does it work?
To create a task tag go to Configure >> Order settings >> Order. Toggle on Task Tagging & create tags.
You can assign these tags to particular products or categories for a merchant as per your requirement.
These task tags can also be assigned to your driver agent. So the benefit of this feature is the assignment done by Tookan is based on matching these tags with each other.
That is, XYZ tag assigned product or category will be assigned to a driver who is assigned the XYZ tag.
This can help when you want specific agents to deliver specific products or categories according to your requirement.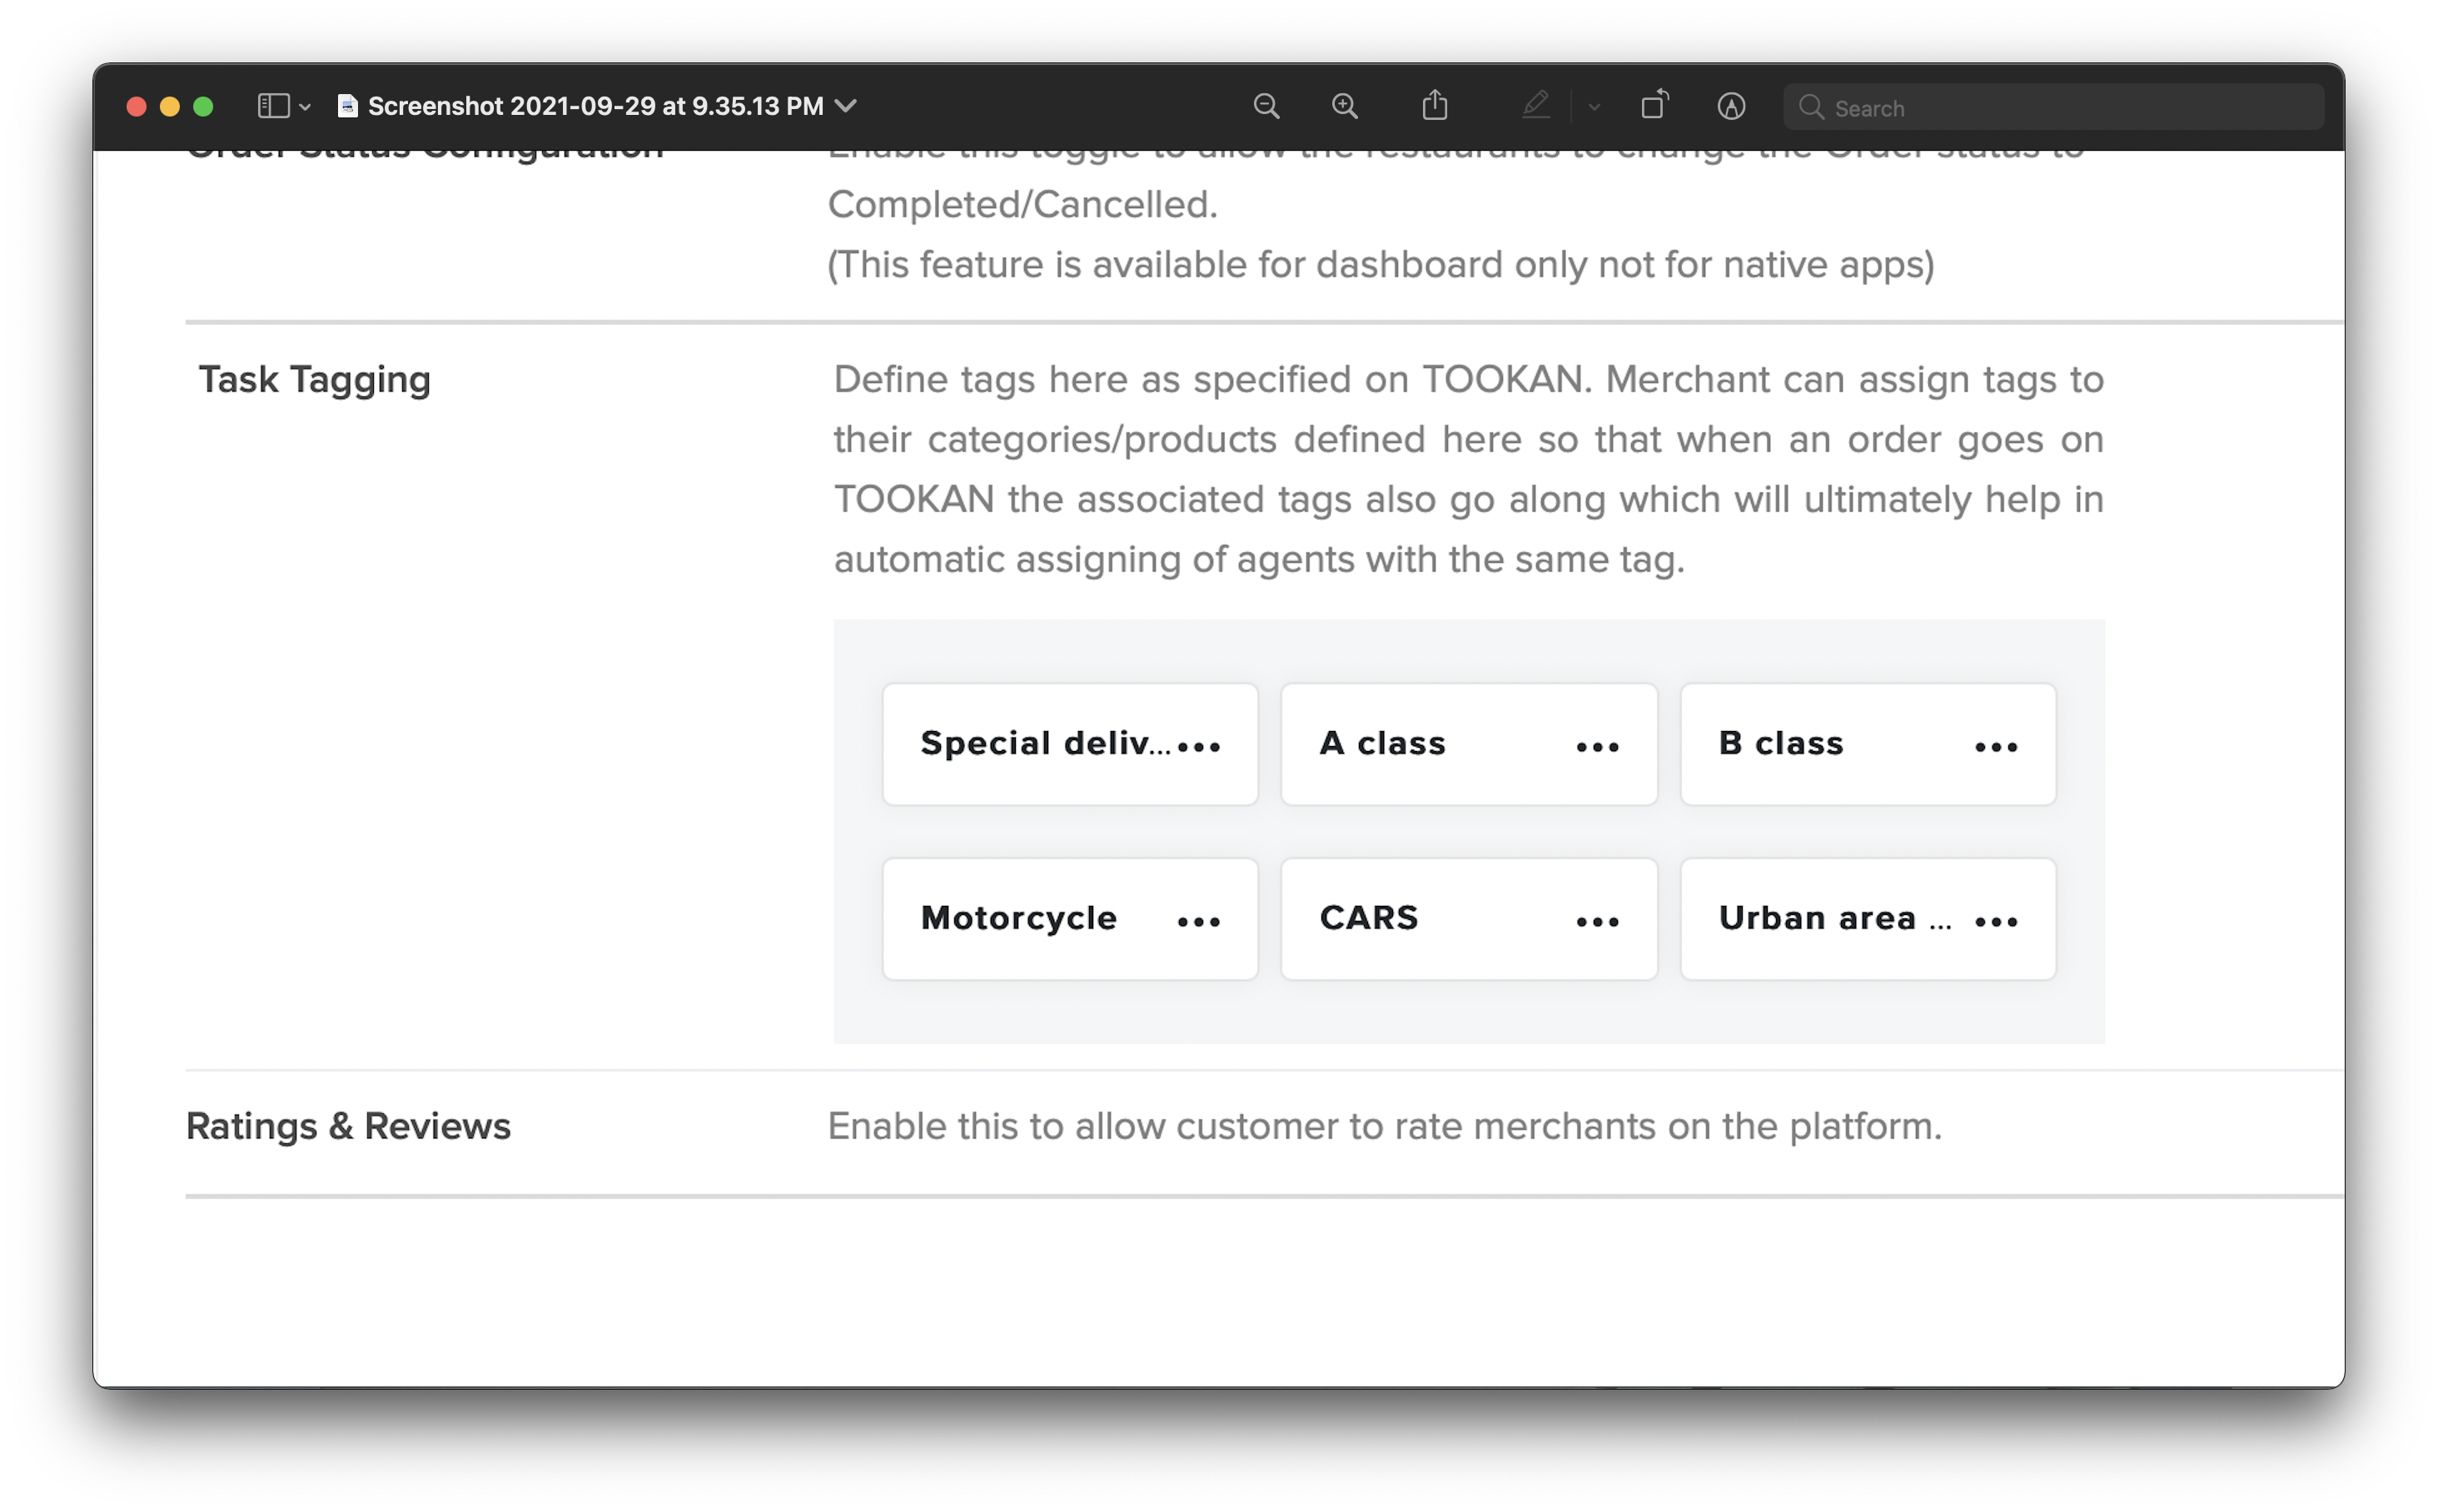
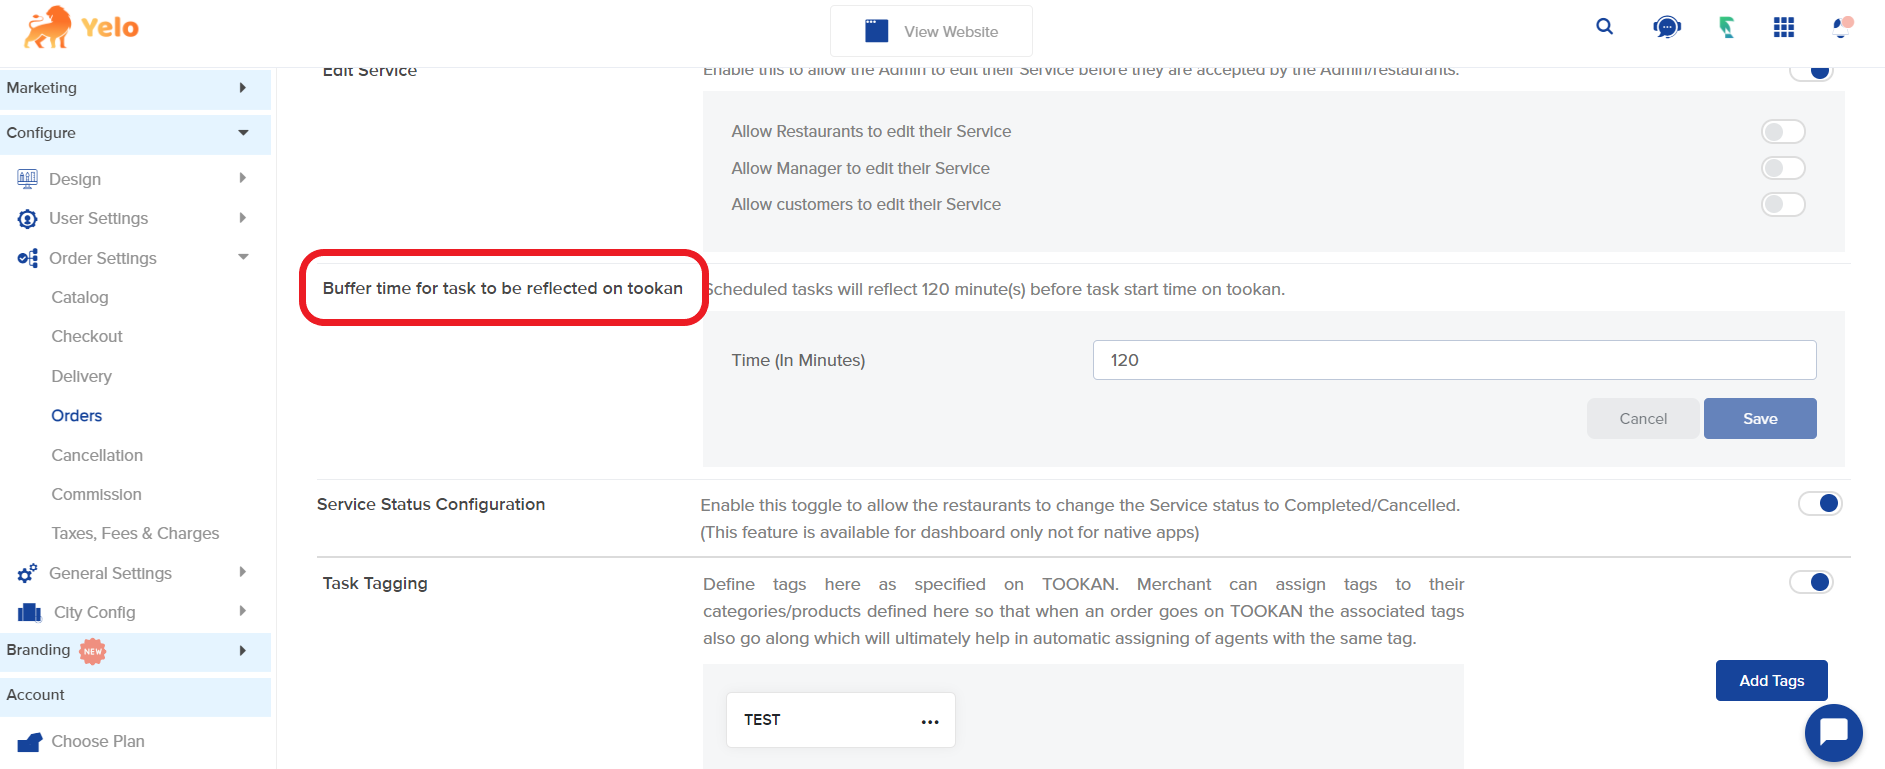
- How can I set a scheduled order to reflect on Tookan at specified minutes before the scheduled time of delivery?If you do not want scheduled orders to reflect on Tookan immediately after the order is placed you can configure Buffer time to be specified minutes before the order is assigned to tookan. For changing the settings you may go to your Admin Dashboard >> Configure >> Order settings >> Buffer time for the task to be reflected on tookan & change it from there.
- How can I edit the outstanding payment of a customer?
Go to the order section and open the respective order against which the customer has an outstanding amount. Go to the outstanding amount field. Right next to this field, you will view an edit icon ![]() . Click on this icon and edit the amount to 0. This will clear any outstanding amount against that order and the customer. Kindly refer to the video below:
. Click on this icon and edit the amount to 0. This will clear any outstanding amount against that order and the customer. Kindly refer to the video below:
Checkout FAQs
- How to allow merchants to define side order products/categories?
Go to the configure section and click on the checkout option. You can enable the Side order toggle to enable merchants to define side order products/categories. - How to add tips for drivers on custom orders?
Please note you can use the Checkout Template feature for the same. By going under configure >> order settings >> checkout and scroll down to find the custom order templates. Here, you can set up the template as you’d like and choose the single select Field Type. Then you can click under view and choose the various tips you’d like to receive. - How to enable or disable the COD option from the checkout page?
You can enable or disable the COD option by going to configure section -checkout enables or disables the COD status in Payment Option. - How to add custom information with an order that the customer can fill during checkout?
Go to the Configure section click on the checkout option and click on enable Checkout Template. You need to enter a field name – field type and value. - Is it possible to make associate custom information mandatory while checkout?
Yes, you can make associate custom information mandatory. By going under configure >> order settings >> checkout and click on the check box next to the checkout template. - How Do I Enable the Edit order/Booking Function?
In order to Enable the edit order/booking function. You need to enable the Outstanding Payment option from Your Admin panel. Go to Configure >> Order Settings >> Checkout click on Outstanding Payment toggle then go to the order settings >> orders >> Enable the edit order toggle. - Can we add restrictions during the checkout page for specific users/products?
Adding a restriction during checkout is not feasible as of yet. You can add a field of additional information in the checkout template which you will find in configure >> order settings >> checkout and then you can view that answer in order details and proceed accordingly. - Only pin code is showing in address, how do I make full address mandatory?
Configure>>order settings >> checkout >> enable toggle ”New Address Flow” and make the below fields mandatory.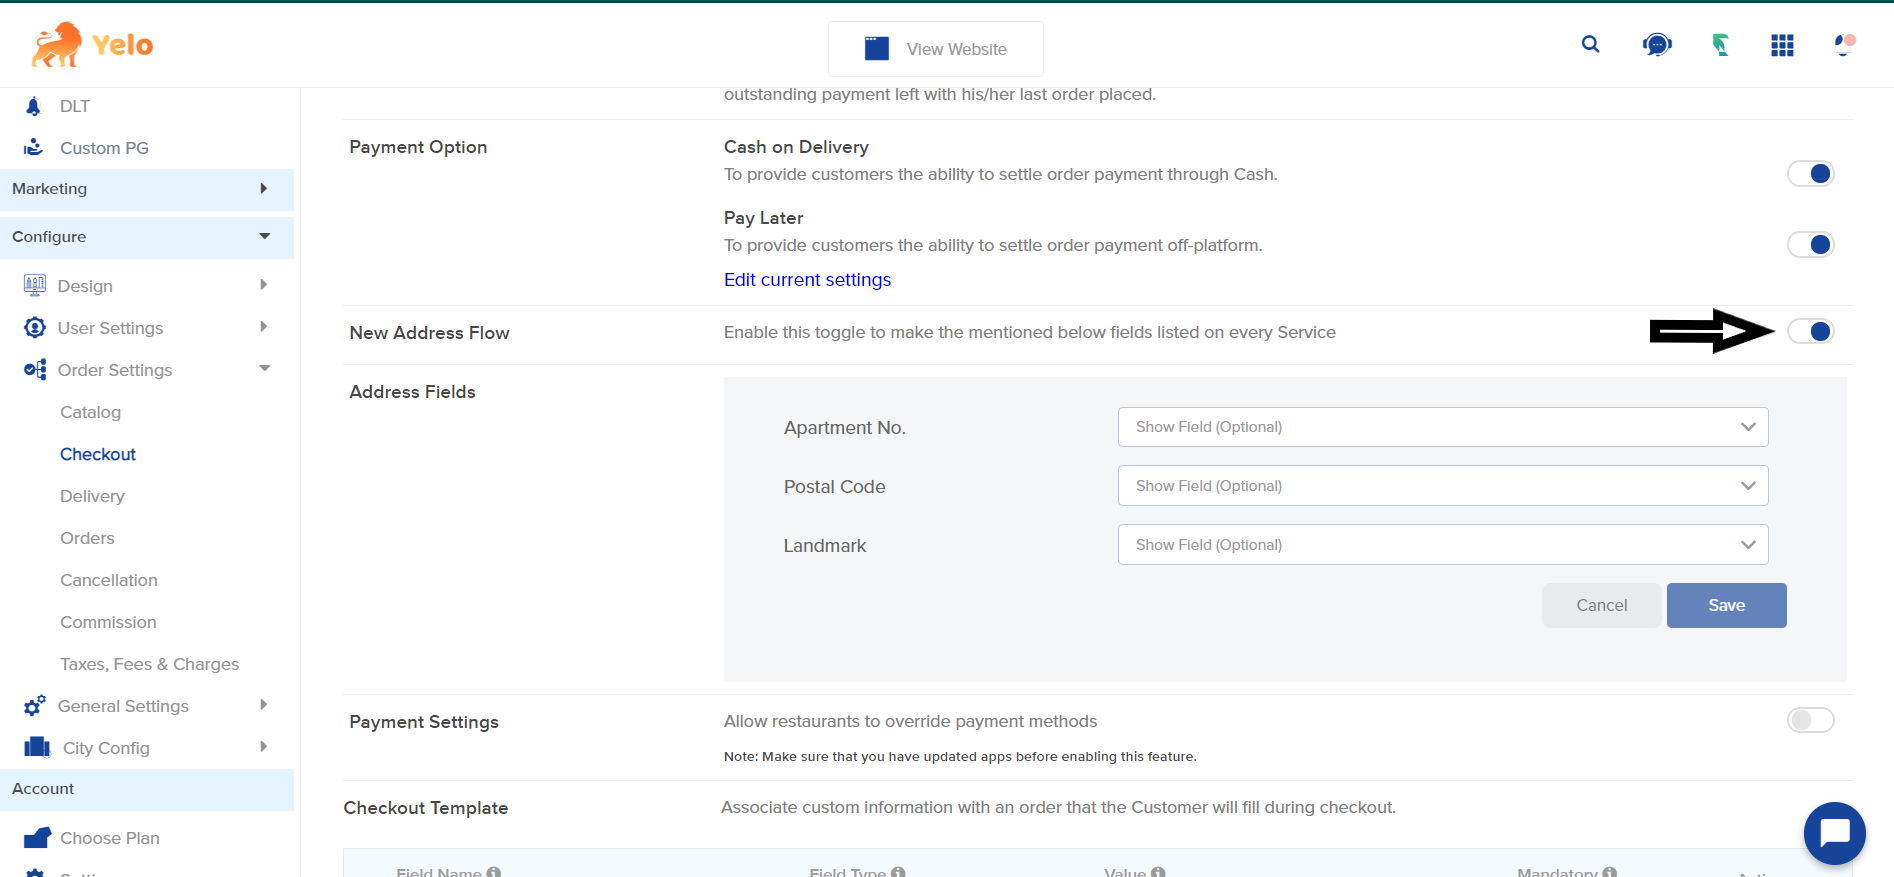
How to block custom checkout templates?
You may refer to the points/steps given below for the issue resolution. To remove the checkout template from the marketplace. - Go to configure >> Order settings >> checkout.
- Scroll down to the checkout and select a checkout template.
- Delete from actions.
To remove a custom checkout template from a specific store. - Choose store.
- Go to configuration.
- Scroll down and select checkout template & Delete under actions.How to add tips for drivers on custom orders?
Please note you can use the Checkout Template feature for the same. By going under configure >> order settings >> checkout and scroll down to find the custom order templates. Here, you can set up the template as you’d like and choose the single select Field Type. Then you can click under view and choose the various tips you’d like to receive.Can I provide the Pay Later Option for any particular customer based on their purchase if they have a good purchase history?
You can enable the Pay later status for any particular customer also. Go to General >> Customers >> Select or search the customer you want to provide the Option >> Click on their ID >> Enable the Pay later toggle on. By this only your selected customer can have the benefits of Pay later.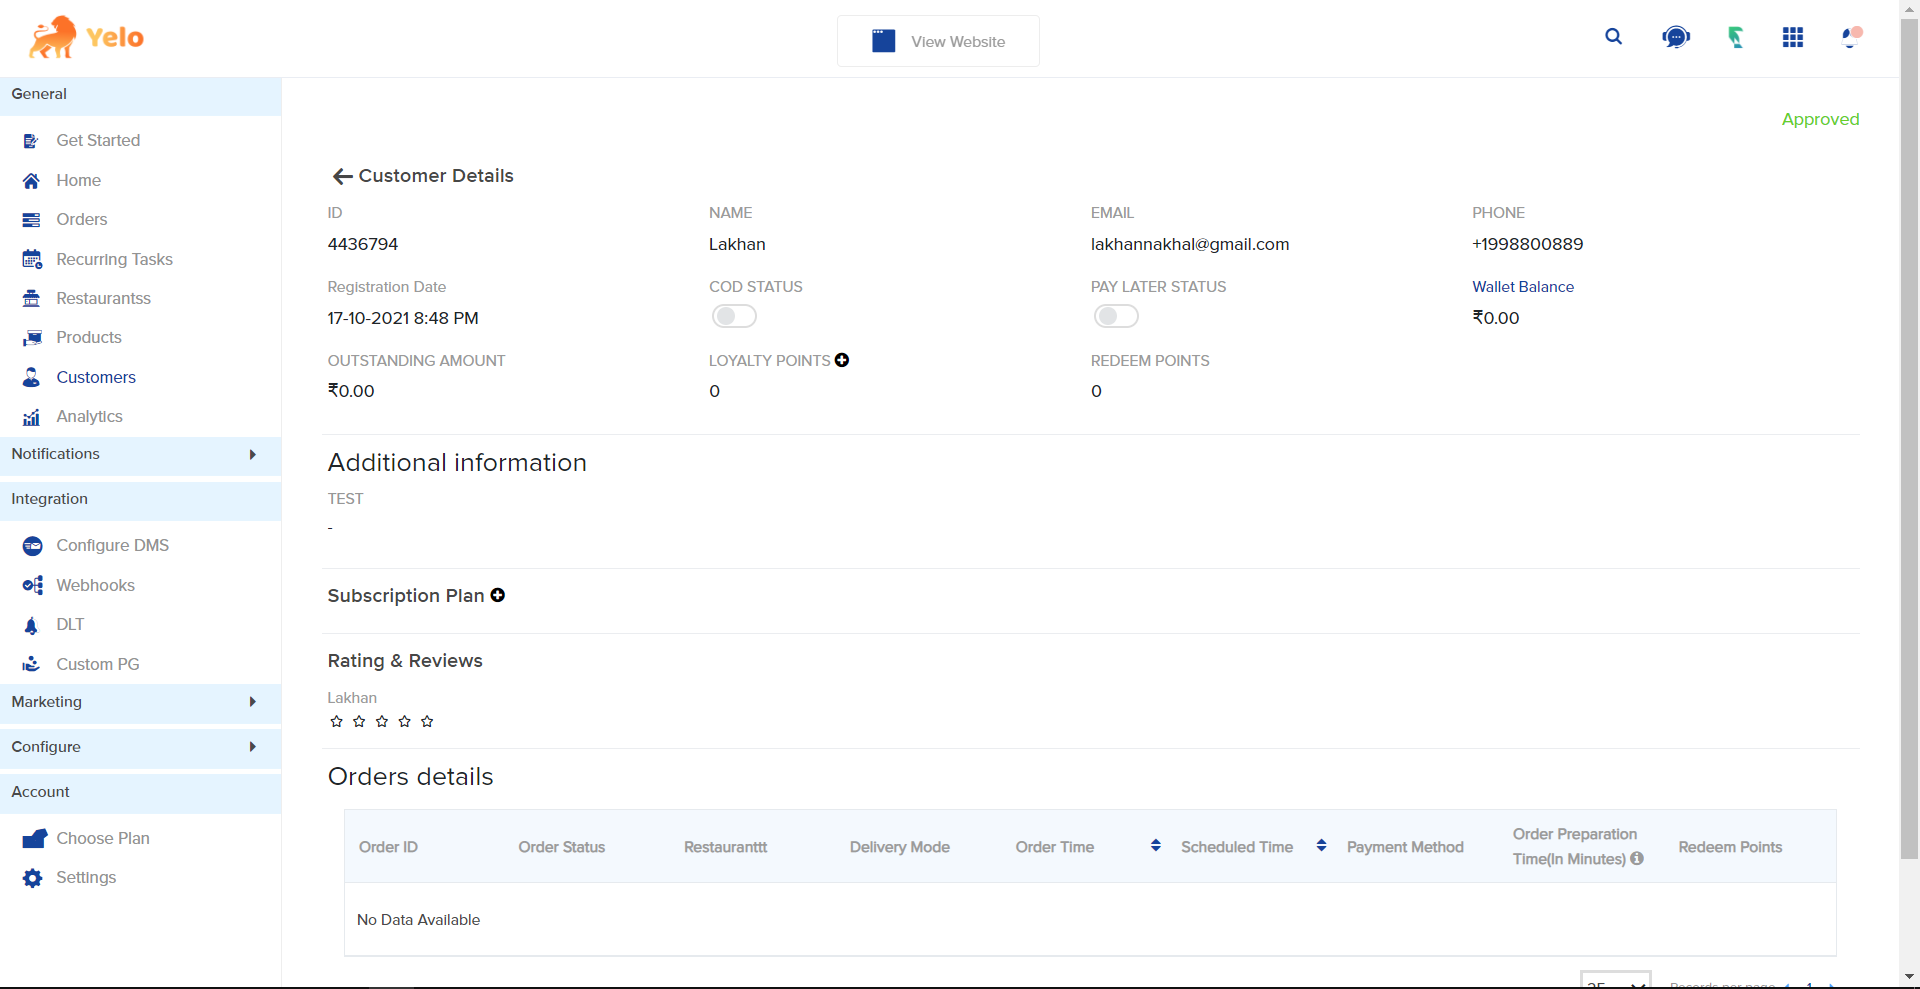
Delivery FAQs
- Why are the delivery charges not getting added to the platform?
This can happen if you have enabled the toggle of free delivery after a fixed amount in the field. It activates the option to waive off delivery charges where delivery is by admin. You can remove it under configure >> order settings >> delivery, and then turn off the option of free delivery.
- The delivery address does not save when you change it on the edit address then how I can save the address?
On the store list page, the location that you enter or are fetched will be that address that will reflect on the checkout page as well, you can further edit it but when you refresh it changes back to your current address. This is the workflow of the edit address.
In contrast to this, you can click on add address and save it for your use.
- Orders were not sent to Tookan immediately. We had to send it manually to Tookan.
Your orders are not being assigned to tookan immediately. This issue you are facing is because you have configured buffer time to be X minutes before the order is assigned to tookan. For changing the settings you may go to your admin dashboard >> configure >> order settings >> Buffer time for task to be reflected on tookan & change it from there. - How do you set a merchant so that the customer is the pickup and the merchant is the drop off?
In order to do it, please go to your Admin Dashboard, on the left you will find the Configure section >> Order Settings >> Delivery >> Delivery flow by TOOKAN. Kindly toggle this form the Left flow to Right to achieve your desired results.
- How can a customer know the total time of delivery for a product on the marketplace including order preparation time as well as delivery time?
For this, you have enabled the Estimate Time of Arrival toggle from Configure >> Order settings >> Delivery. This will calculate the time according to the distance between the merchant and the customer along with order preparation time.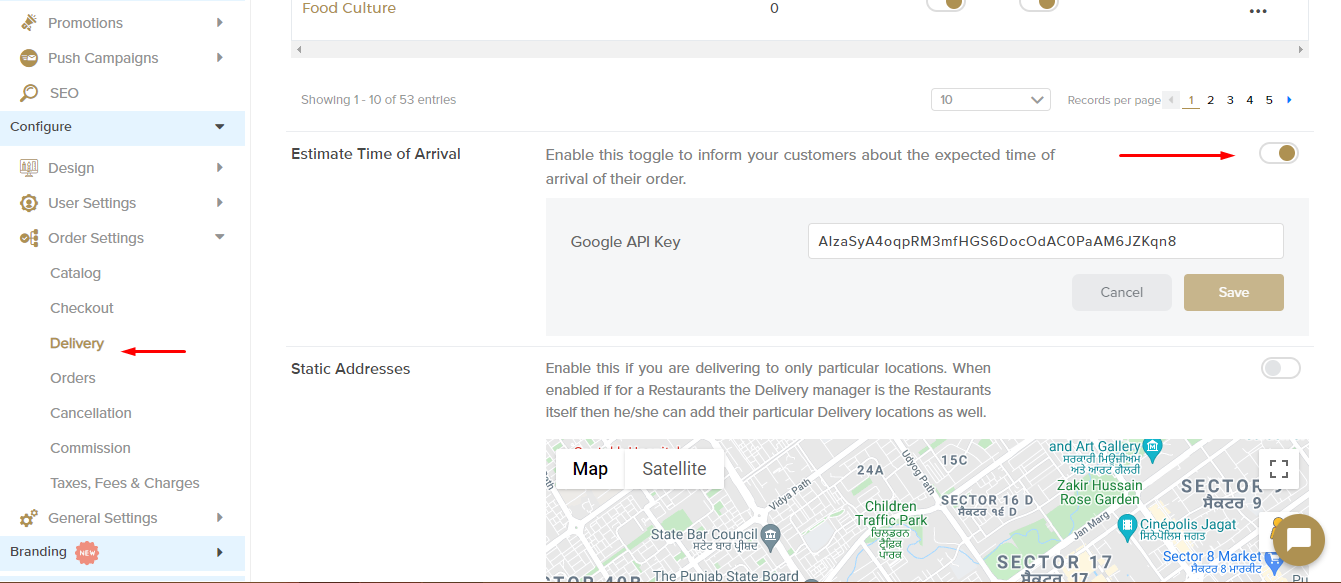
Cancellation Policy FAQs
- How to enter pre-defined cancellation reasons?
- Click on configure on the left side >> Order Settings >> Choose Cancellation.
- Move toggle from custom to predefined.
- Type reasons of cancellations.
- Click Add.
2. How to add a cancellation policy?
- Click on configure on the left side >> Order Settings >> Choose Cancellation.
- Click on add a new policy.
3. Can the admin allow merchants to define their cancellation policy?
- Click on configure on the left side >> Order Settings >> Choose Cancellation.
- Under Cancellation Policies enable the toggle to allow merchants.
4. Can we allow an auto refund on cancellations made by admin/merchants?
- Configure.
- General Setting.
- Preference.
- Enable Auto Refund (Allow auto refund when order is canceled by the Admin/Restaurants/Manager).
5. How can a customer view a cancellation policy?
- Enter customer website.
- Click on the profile name on the top right.
- Go to Orders.
- Click *Cancellation Policy on each order.
- A pop-up will show the criteria.
6. How to enter pre-defined cancellation reasons?
- Click on configure on the left side.
- Click Order Settings,
- Click Cancellation.
- Move toggle from custom to predefined.
- Type reasons for cancellations.
- Click Add.
7. How to add a cancellation policy?
- Click on configure on the left side.
- Click Order Settings.
- Click Cancellation.
- Click on add a new policy.
8. Can the admin allow merchants to define their cancellation policy?
- Click on configure on the left side.
- Click Order Settings.
- Click Cancellation.
- Under Cancellation Policies enable the toggle to allow merchants.
9. Can we allow an auto refund on cancellations made by admin/merchants?
- Configure
- General Setting
- Preference
- Enable Auto Refund (Allow auto refund when order is canceled by the Admin/Restaurants/Manager)
10. How can customers view cancellation policies?
- Enter a customer website.
- Click on profile name on top right
- Go to Orders
- Click *Cancellation Policy on each order.
- A pop up will show the criteria
11. Request For “Order Cancellation Reason Option “
- We would like to inform you that, for turning ORDER cancellation option, you need to go to your Admin Dashboard >> Configure >> Order settings >> Cancellation >> You can turn on the toggle. The order cancellation option will be turned on by the toggle.
12.How to add a pre-defined cancellation policy?
- To add a predefined cancellation policy, you first need to enable Cancellation in
- Configure >> Order Settings >> Cancellations >> Enable toggle >> Move the toggle from Custom to Pre-defined and enter the reasons >> Click Add.
Taxes, Fees & Charges FAQs
- Can we set a marketplace tax on all or multiple merchants?
- Configure.
- Order Setting.
- Taxes Fees & Charges.
- Click add on Marketplace Level Taxes.
- Choose Tax to be applied on Product, Marketplace, or Delivery.
- Enter Tax details and assign merchant/s.
2. How to enable a tax on stores?
- Configure.
- Order Setting.
- Taxes Fees & Charges.
- Click add on merchant Level Taxes.
- Choose merchant from the dropdown.
- Fill in tax details and tax applied on.
- Click Submit & ensure it’s enabled.
3. Can we allow merchants to set their own taxes, fees, and charges?
- Configure.
- Order Setting.
- Taxes Fees & Charges.
- Enable the toggle under Restaurant Level Taxes asking to allow restaurants to set their own taxes, fees, and charges.
4. How to enable additional charges on stores/marketplace?
- Configure.
- Order Setting.
- Taxes Fees & Charges.
- Click Add on Additional charges.
- Fill in details and choose tax applicable on total or subtotal.
- Click Submit.
5. How to set a tax on products?
- Head to Configure on the left sidebar of your dashboard and select Order Settings from the dropdown menu.
- Scroll down to select Taxes, Fees & Charges under Order Settings.
- A new window will appear. Click on Service from the drop-down menu besides Multi Merchant Level Taxes.
- Click on Add, and you will see a new dialogue box. Fill in all the required tax details and click on Submit.
- Head to Multimerchant on the left sidebar of your dashboard again and click on the merchant store name you selected earlier.
- Now, click on Catalogue.
- Choose the product that you want to edit by clicking the three dots.
- A new dialogue box will appear. Here, fill in the details in the taxes, bar and click on Save.
6. Can we set a marketplace tax on all or multiple merchants?
- Configure.
- Order Setting.
- Taxes Fees & Charges.
- Click add on Marketplace Level Taxes.
- Choose Tax to be applied on Product, Marketplace, or Delivery.
- Enter Tax details and assign merchant/s.
7. How to enable a tax on restaurants?
- Configure.
- Order Setting.
- Taxes Fees & Charges.
- Click add on merchant Level Taxes.
- Choose merchant from the dropdown.
- Fill in tax details and tax applied on.
- Click Submit & ensure it’s enabled.
8. Can we allow restaurants to set their own taxes, fees, and charges?
- Configure.
- Order Setting.
- Taxes Fees & Charges.
- Enable the toggle under Restaurant Level Taxes asking to allow restaurants to set their own. taxes, fees, and charges?
9. How to enable additional charges on stores/marketplace?
- Configure.
- Order Setting.
- Taxes Fees & Charges.
- Click Add on Additional charges.
- Fill in details and choose tax applicable on total or subtotal
- Click Submit.
10. Unable to add taxes in some cities, whereas the tax is working in other cities perfectly.
At the time of the creation of the new tax, you can define the city in which you want that tax to be implemented.
Commission FAQs
- How do I transfer the payment of delivery charge if delivery is done by the Merchant?
Go to Configure >> Order Settings >> Commission Under Set up you can turn on the toggle Transfer the Commission of Delivery Charges.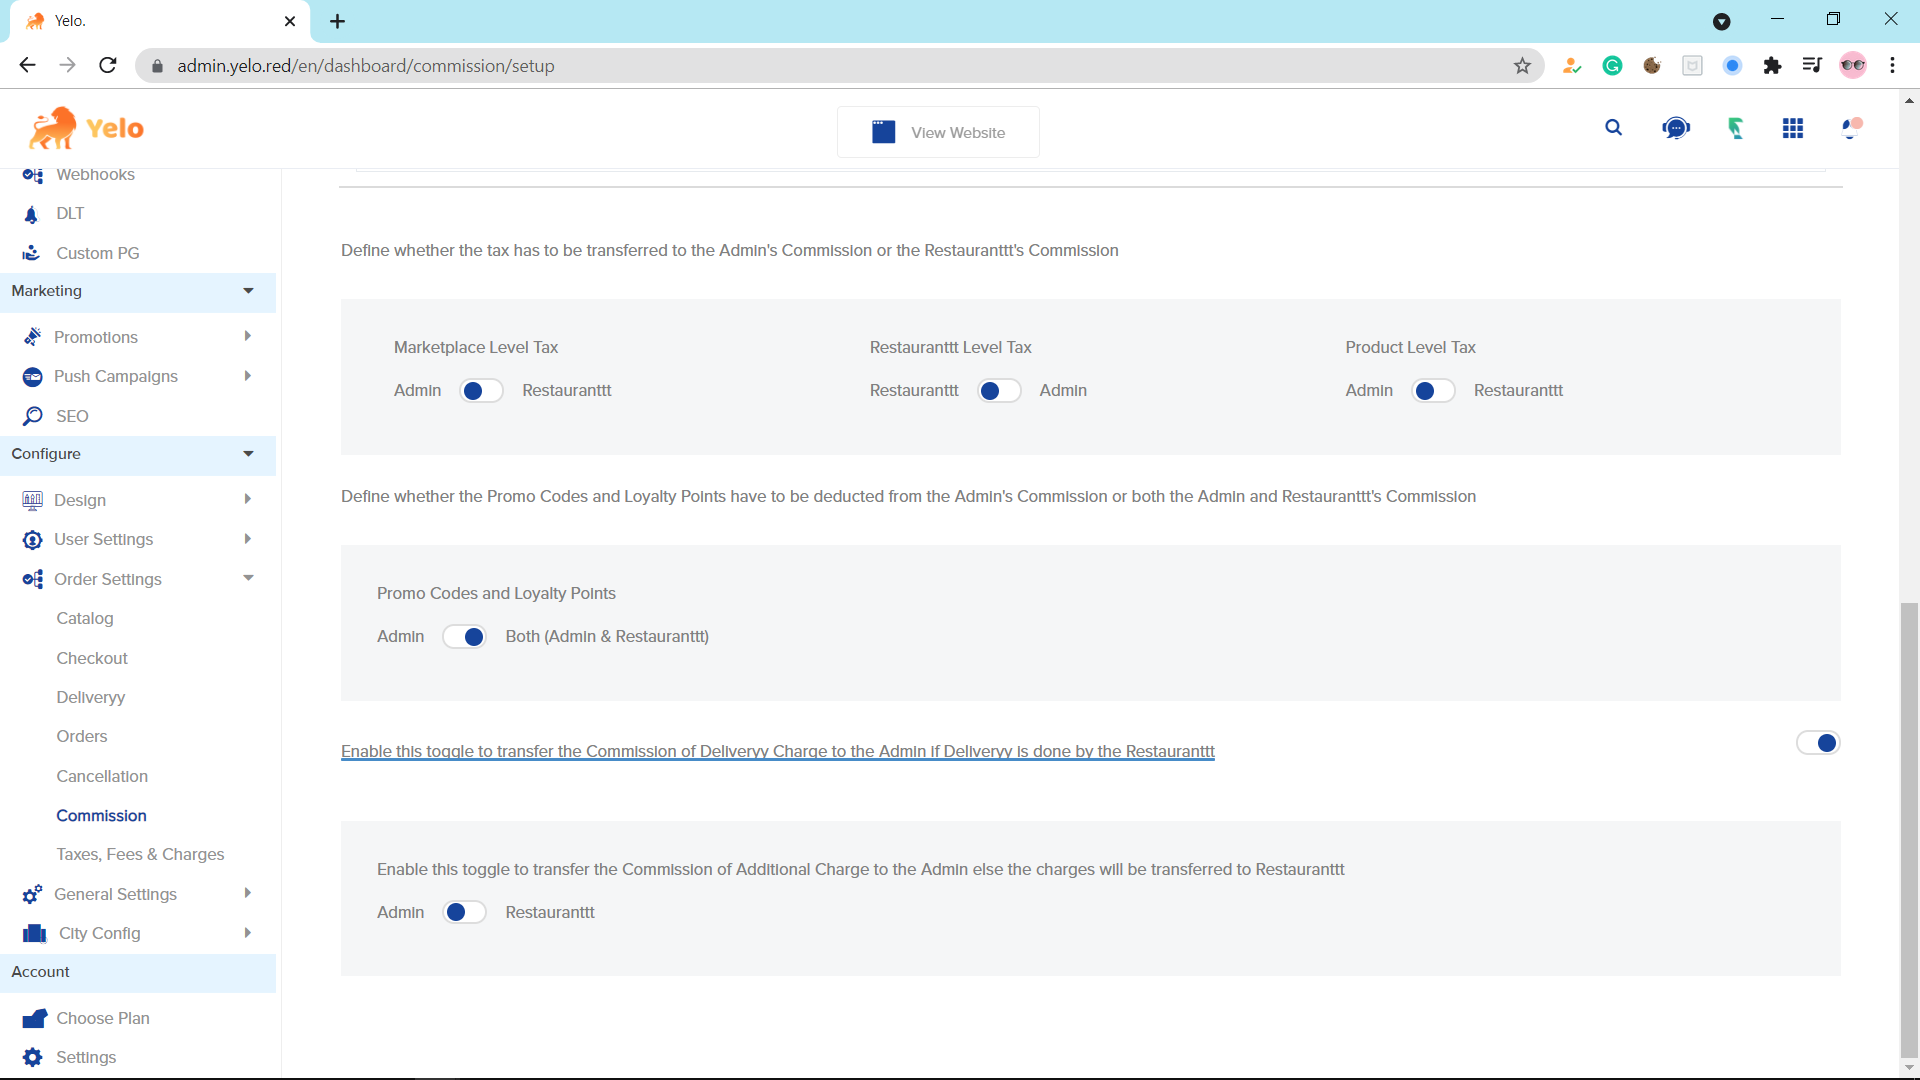
- Can we split the payment of orders paid through a wallet?
Yes. Payments made through the wallet can be split between admin and merchant.
In Configure>>Order Setting>>Commissions>>Enable toggle of Wallet Commission Transfer.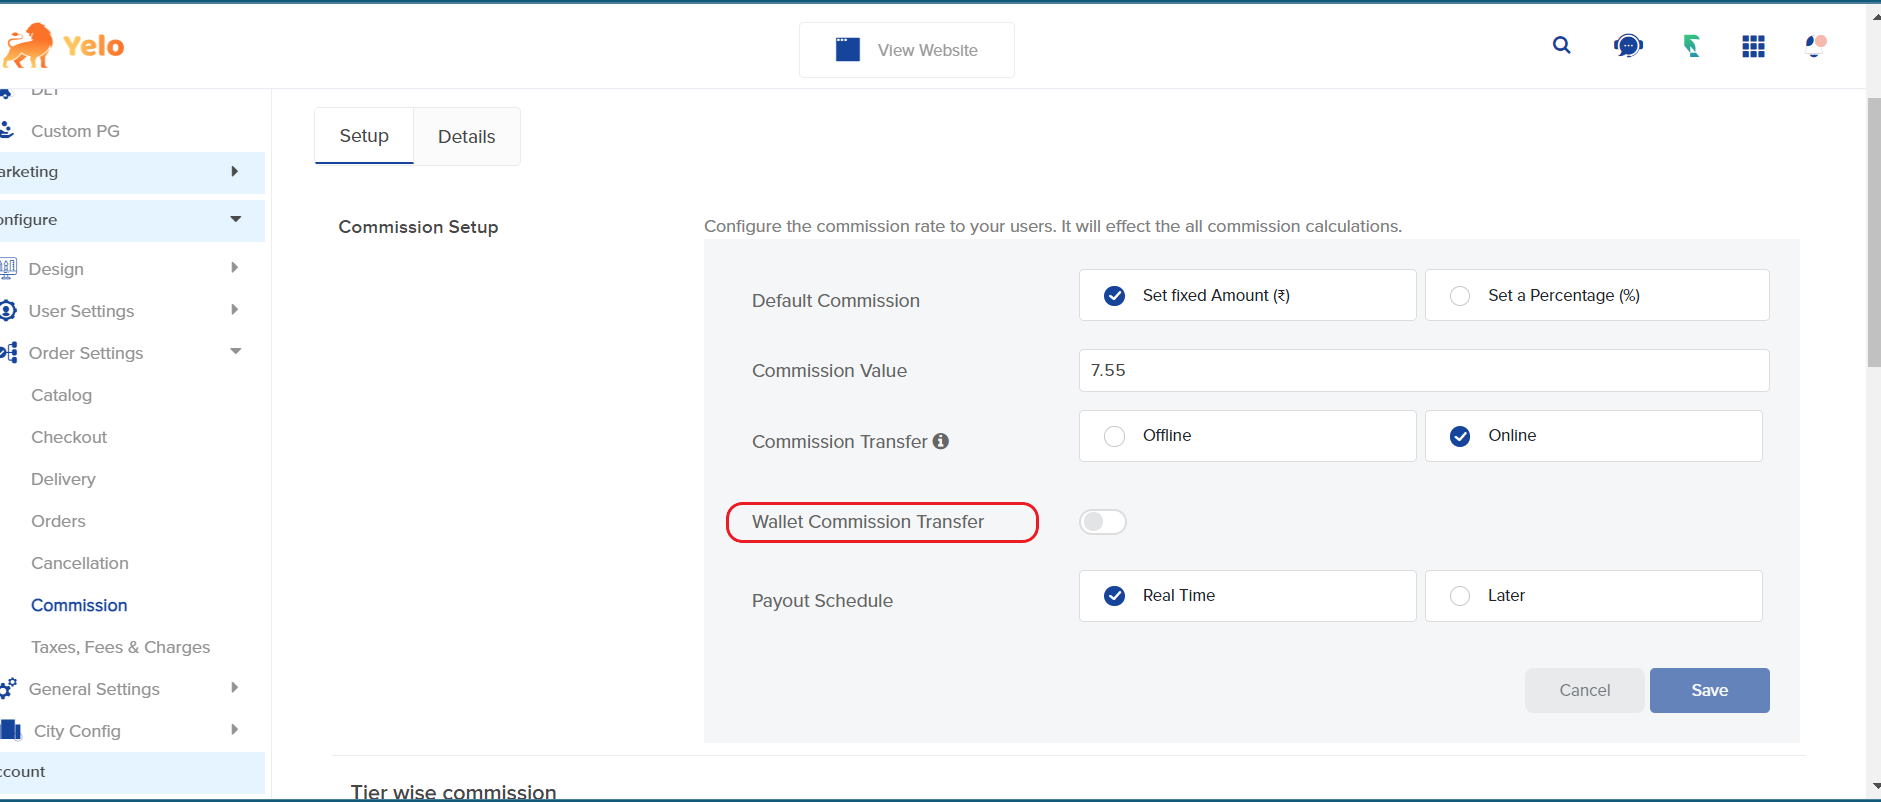
- where we can define whether the delivery fee has to be transferred to the Admin’s Commission or the Store’s Commission?
Go to Admin dashboard >> Configure >> Order Settings >> Commission. On this page, the last toggle is the one where you can decide whether the delivery fee commission goes to the admin or store. You also have the option to transfer the commission to the admin even if the delivery is done by the store.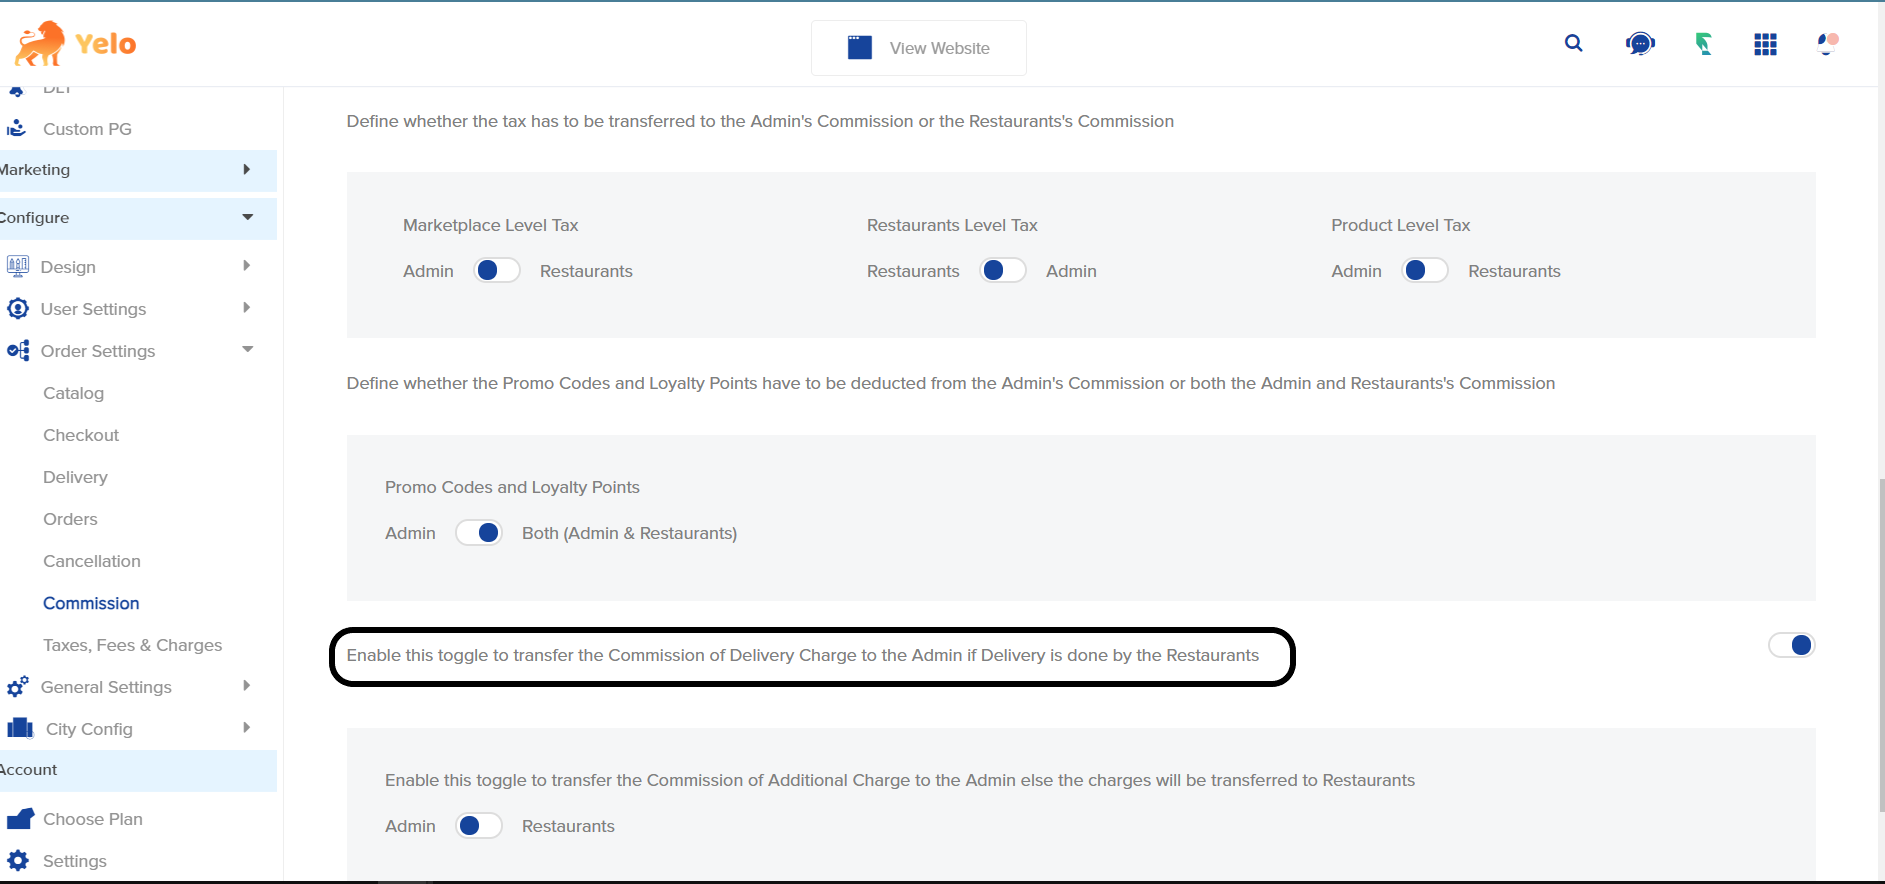
- How can we check the commissions that have been paid in the past?
Go to General >> Configure >> Order settings >> Commission . On the Commission, page click on Details. Here you can see the details of all the Commissions that are paid or unpaid yet. You can also filter out the commissions by date on the same page.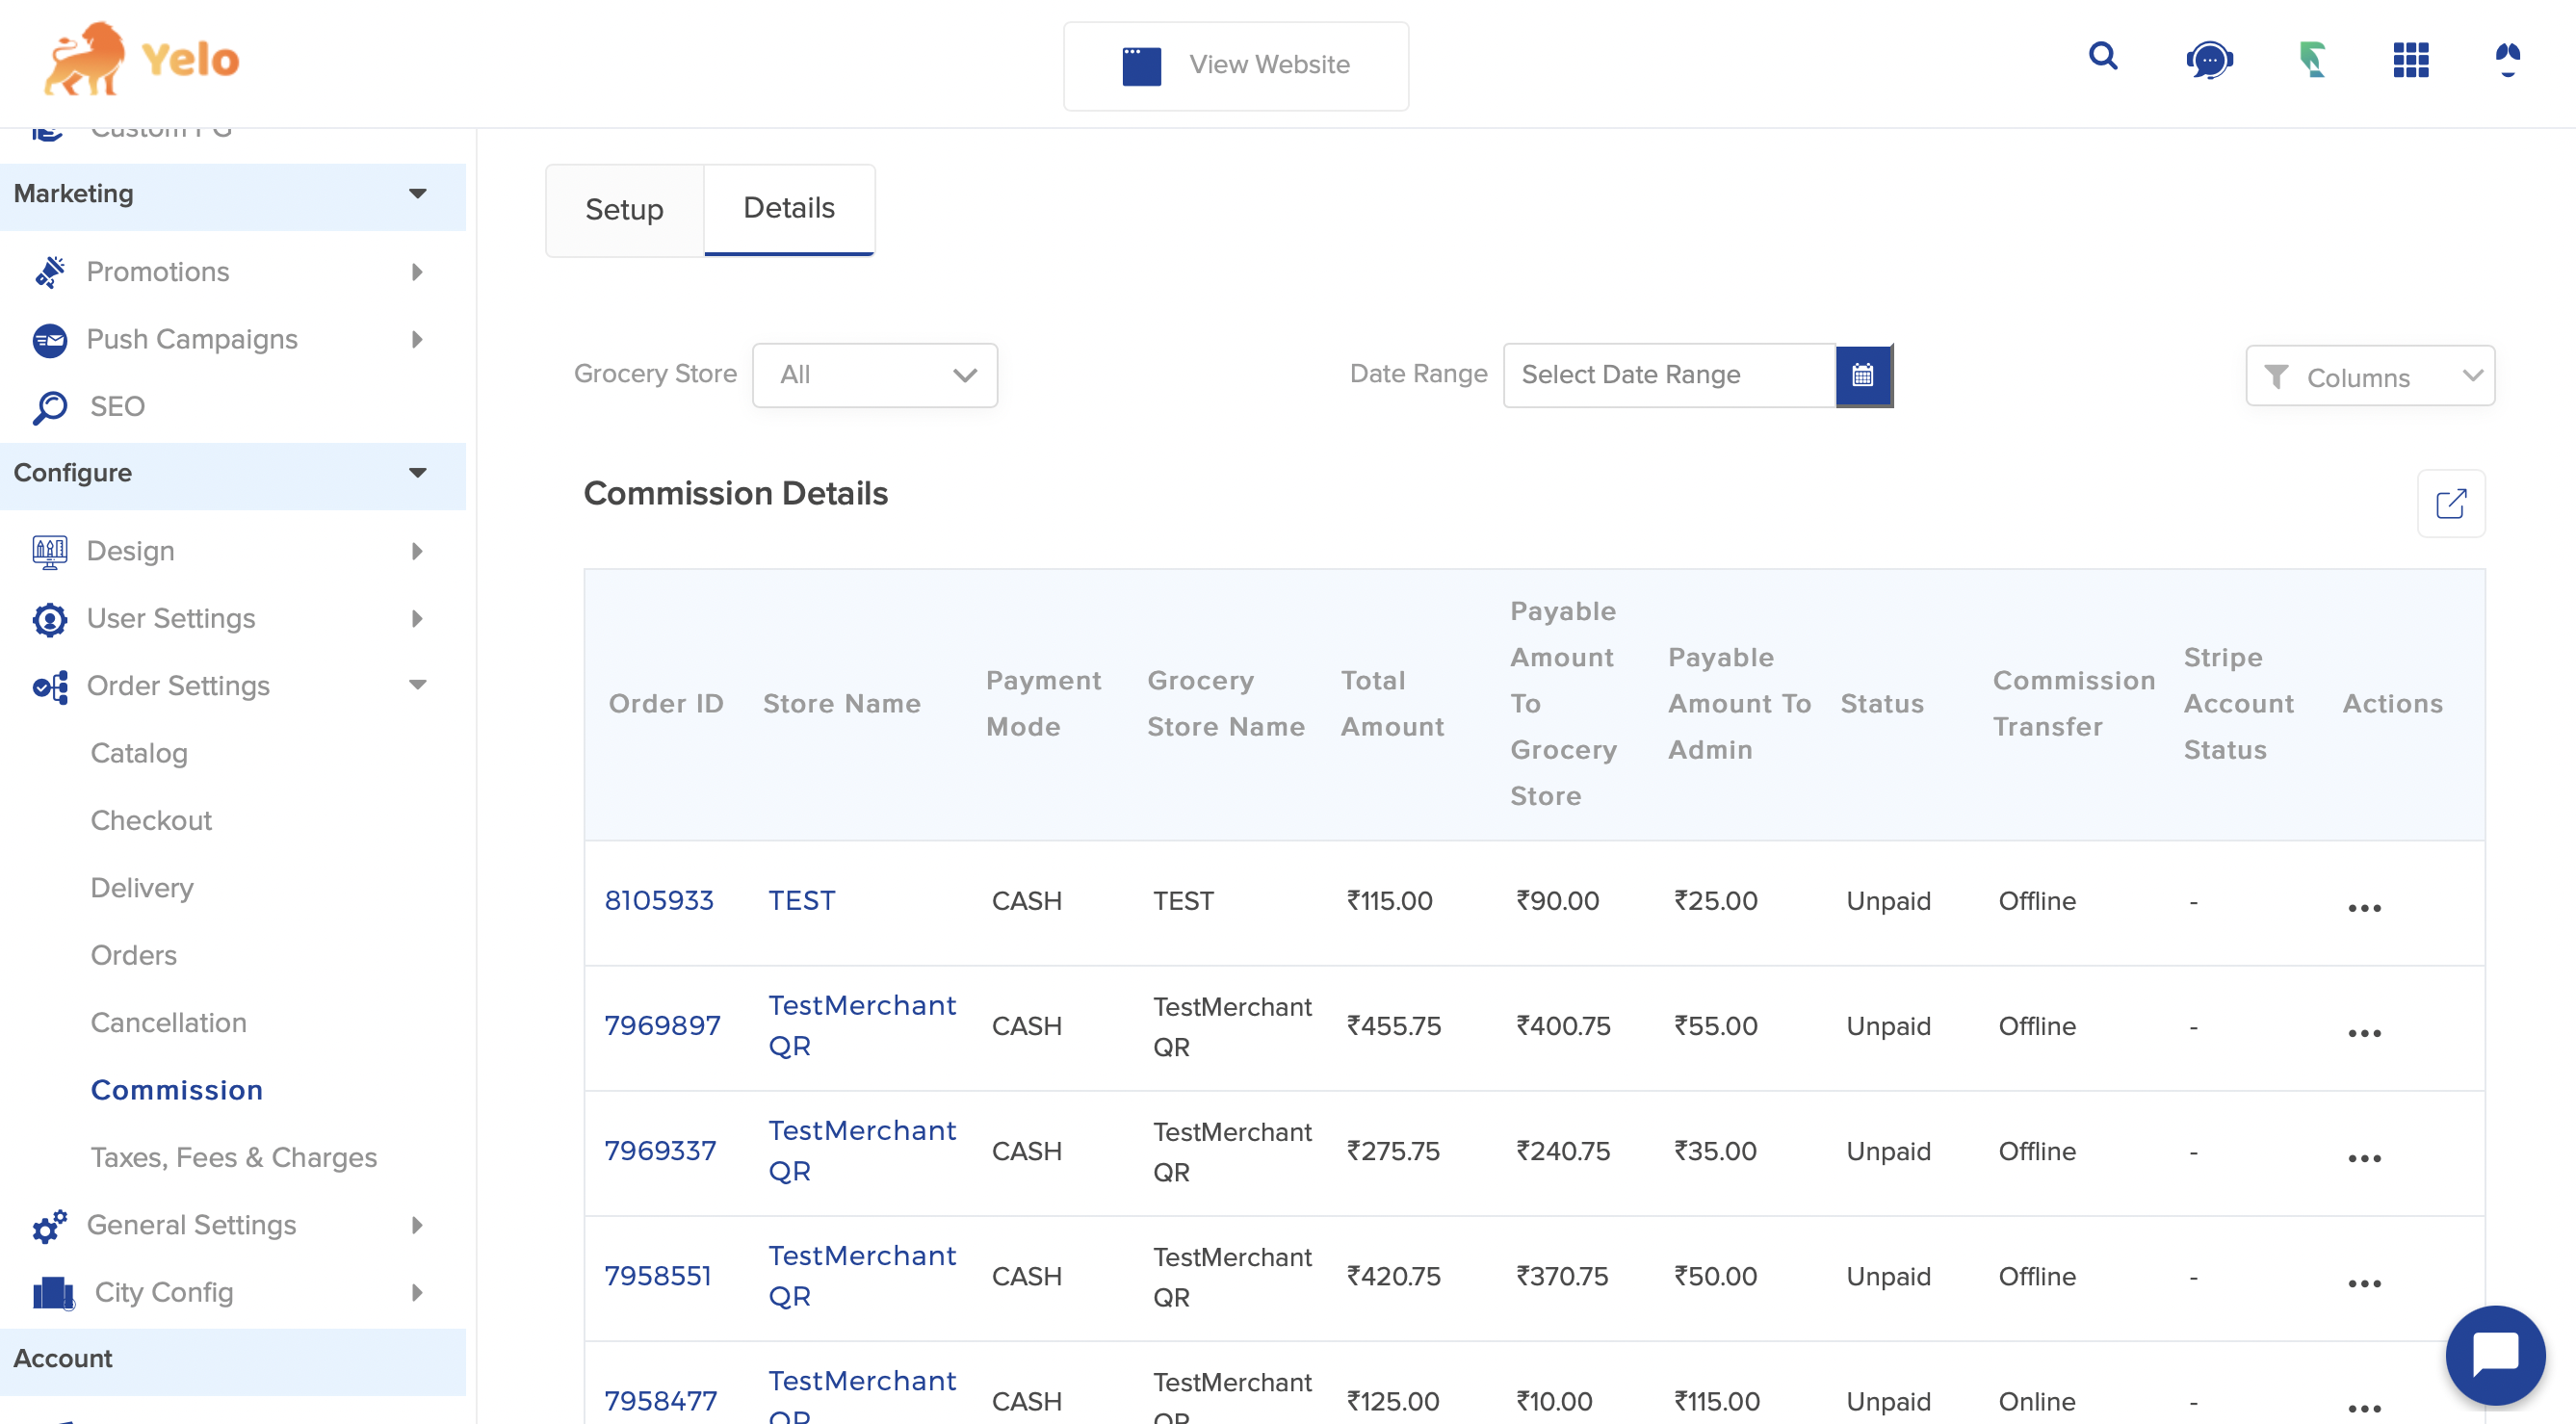
- What is the commission flow in Yelo?
For agent commissions, we have agent pricing rules and templates in our delivery management software: Tokens and commission setup in Yellow, which allows you to set up a commission based on the total number of tasks performed by agents or remote commissions and a fixed amount or percentage of commission Helps to set commission. Your merchants and agents that you can create or use predefined templates.
Leave A Comment?